hourglass_full Your download should start automatically in a few seconds...

Download 山ガールカレンダー Free_Latest Version.apk from Apk-Dl Server
Thank you for using Apk-Dl.com to download the apk file (山ガールカレンダー Free_Latest Version.apk),
If the download doesn't start automatically in a few seconds, please click here to access the download URL directly.
Note: Download and save the apk file to your Android Phone's SD card and install it manually onto the Android device.


Description
GPSでルートトラッキング、写真やアイコンをルート上に保存することができます。地図はGoogleマップと国土地理院の地図に切り替えできます。
写真にコメントを保存でき、思い出作りにぴったり!歩いた時間・距離・標高なども記録できます!
また、ご自身のハイキング記録を「山ガールカレンダー」をお使いのお友達とシェアすることができます!お友達が初めて行く山でルートや注意箇所など、あなたの情報が共有できて大変便利です!
注)
*Google カレンダーとは同期しません。
*GPSは端末の性能に依存します。
*山ガールカレンダーは低山&日帰りハイキング向きです。
*保存されている画像の量により、保存クラウドに多少時間かかります。
山ガールカレンダーを起動していただき、携帯のメニューボタンをタップしてください。
1.「設定」:カレンダーのサイズや週の始まりの曜日などを設定できます。
2.「バックアップ」:
ーーー取込SDカード:データをSDカードから取込ます。
ーーー保存SDカード:データをSDカードに保存します。
ーーー保存クラウド:データをGoogleDriveもしくはDropboxにバックアップし、データ移行することができます。ネット経由で簡単にデータ移行ができます!
3.「パスワード」:パスワードを設定できます。
4.「SDカードにコピー」:データのバックアップと内部外部SDカードへデータをコピーします。
5.「アラーム」:音量やサウンドの設定をします。
6.「リカバリー」:データを以前の状態に戻すことができます。データが削除されるので、ご使用にはご注意ください。
<山ガールカレンダーの使い方>
初期画面はカレンダーです。
*まず、登る予定の山を登録しましょう!
1.+ボタン「追加ボタン」をタップします!
2.山登録画面へ移動します。
3.山名を入力します。
4.+ボタンで保存します!
5.携帯の「Back」ボタンで保存・カレンダーに戻ります。
*いざハイキング開始です!
1.カレンダー下の「GO!」ボタンをタップしてください。
2.山リストが表示されますので、山名をタップしましょう!
3.開始画面が表示されます。
4.「開始」ボタンで計測が始まります!
5.「お知らせ」を設定すると、ハイキング中に時間経過を知ることができます。
*計測開始後→記録タグ
計測を開始すると、記録へ移動します。
1.記録タグが選択されています。
2.開始した時間が、項目”時間”のボタン上に表示されています。
3.右上の「終了」で計測を終了します。
*記録タグで計測中
1.画面右下「カメラ」ボタンで撮影を開始します。
2.画面左下「アイコン」ボタンです。タップするとアイコン一覧が表示されます。
<アイコンの登録>
1.例えば、「分岐」アイコンをタップしてみてください。
2.分岐登録画面へ移動します。
3.”左” ”右” ”真ん中” ”未選択”と分岐を選択できます。
4.”コメント”に注意点などのメモを保存できます。
5.「記録」ボタン:アイコンを保存します。
6.「写真も記録」ボタン:タップするとカメラが起動し、写真とアイコンが同時保存できます。
7.「キャンセル」:登録をキャンセルします。
*記録タグで計測後
計測が終了すると、画面右上に「共有」ボタンが表示されます。ご自身のハイキング記録を「山ガールカレンダー」をお使いのお友達とシェアすることができます!お友達が初めて行く山でルートや注意箇所など、あなたの情報が共有できて大変便利です!
1.「共有」ボタンをタップしましょう!
2.データエキスポート画面で「OK」を選択。
3.一覧から「Gmail」を選択。
4.メールでお友達にご自身の記録を送信できます!
*マップタグ
「マップ」タグをタップしてください。計測中・後の地図が見ることができます。
<画面右下の「リスト」ボタン>
1.タップすると、一覧が横一列に表示されます。
ーーー「標高」:山の標高グラフが表示できます。
ーーー「マップ変更」:航空写真の地図に表示切り替えます。元に戻すにはもう一度一覧より、「マップ変更」をタップしてください。
ーーー「Googleマップ」:Googleマップアプリを立ち上げます。
ーーー最後のリストは、「国土地理院」:国土地理院のマップを立ち上げます。
<画面左下の「切り替え」ボタン>
こちらでは写真とアイコンのマップの表示切り替えができます。
1.「ALL」:全てを表示させます。
2.「非表示」:カレンダーにルート以外には何も表示させない選択です。
3.「カメラで撮影」:撮影箇所のカメラアイコンのみを表示させます。
4.それ以外は各アイコンを個別表示させるための選択です。
<マップタグの切り替えボタンを押し、「カメラで撮影」を選択>
1.ルート上にカメラマークが表示されます。
2.そのカメラマークのどれかをタップしてみてください。
3.マップ左上に写真が表示されます。その下の左右の矢印で写真を移動できます。
4.その写真をタップしてみてください。
5.画像編集画面へ移動します。
6.写真左下に撮影した場所の住所が表示され、その下にメモが保存&編集ができます。
7.写真左上の「メール」ボタンで画像をメールで送信できます。
*ギャラリータグ
撮影した写真が全て見れます。
1.写真の一枚をタップしてみましょう。
2.コメントに写真にメモが保存できます!写真を削除することもできます。
3.ギャラリーに戻るには、携帯のBackボタンを押してください。
<ギャラリータグの左下の「コメント」ボタン>
1.コメント&写真の画面へ移動します。
2.こちらでもコメントを保存&編集できます。撮影した時間、距離、標高なども表示されています。
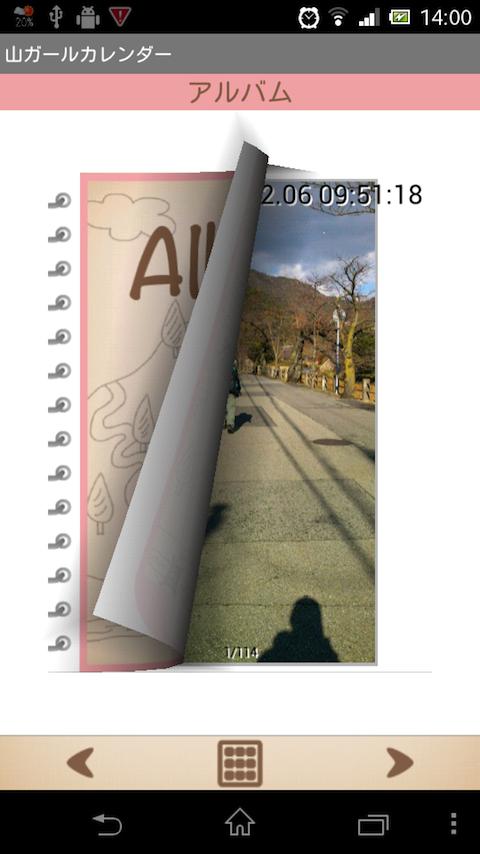
<ギャラリータグの右下の「アルバム」ボタン>
1.アルバム画面へ移動します。
2.アルバム部分を指でドラッグしてみてください。アルバムがめくれます!
*カレンダーの説明
1.記録がある日付には鉛筆マークが表示されます。
2.カレンダー下に山名が表示され、測定中・終了しているマークが表示されます。その部分をタップすると記録画面へ移動します。
<カレンダーの各ボタン>
カレンダー右上から順に下へ
右上左
1.「ヘルプ」ボタン:GalleryAppのレンタルカレンダー説明ページに移動できます。
右上右
2.「マーケット」ボタン:GalleryAppの他のアプリをご紹介しています。
真ん中
3.「週間表示」ボタン:カレンダーを週間表示に切り替えることができます。
下、左より
4.「追加」ボタン:山を登録します。
5.「GO!」ボタン:測定を開始します。
6.「当日」ボタン:日付を当日の日付に戻せます。
7.「左」「右」ボタン:日付を左右に移動できます。
8.「リスト」ボタン:登った山の一覧を、五十音別、標高差別、距離別、時間別に並び替えることができます。
*カレンダー右下端の「リスト」ボタンをタップします。リスト画面に移動します。
<画面上のボタンの説明・左より>
1.五十音別に表示。
2.標高が高い順に表示。
3.標高が低い順に表示。
4.歩いた距離が長い順に表示。
5.歩いた距離が短い順に表示。
6.歩いた時間が長い順に表示。
You can save GPS in route tracking, photos and icons on the root.Map I can switch to the map of Google Maps and Geographical SurveyInstitute.
Photos can be saved a comment, perfect for making memories! Such astime, distance and altitude you walked, you can also record!
In addition, you will be able to share it with your friends a"mountain girl Calendar" hiking record of your own! Your friendsfor the first time go mountain such as the root and attentionplace, it is very convenient to share your information!
Note)
* Google Calendar and does not synchronize.
* GPS depends on the performance of the terminal.
* Mountain girl calendar is Teiyama & Day Hikingorientation.
* By the amount of image that is saved, it will take some time tosave the cloud.
I will start the mountain girl calendar, please tap the mobile menubutton.
1. "Settings": I can set, such as the beginning of the day of thesize and the week of the calendar.
2. "Backup":
ーーー capture SD card: I be taken the data from the SD card.
ーーー save SD card: I will save the data to the SD card.
ーーー save Cloud: back up data to a Google Drive or Dropbox, you willbe able to data migration. I can easily data migration over thenet!
3. "Password": I can set a password.
4. "Copy to SD card": I will copy the data to the data backup andinternal external SD card.
5. "Alarm": I will set the volume and sound.
6. "Recovery": you can return the data to its previous state. Sincethe data is deleted, the use Please note.
The initial screen is the calendar.
* First of all, let's register a mountain of plannedclimb!
1. + Button I tap the "Add" button!
2. I will move to the mountains registration screen.
3. I enter the Yamana.
4. + I will save button!
5. I will return to save calendar in the "Back" button on themobile.
* Emergency is hiking start!
1. Please tap the "GO!" Button at the bottom of the calendar.
2. Because mountain list appears, let's tap the Yamana!
3. Start screen appears.
4. "Start" button in the measurement starts!
5. If you set the "Notice", you will be able to know the timeelapsed during the hike.
* Measurement after the start → record tag
When you start the measurement, and then move to therecording.
1. Record tag is selected.
2. The time has started, are displayed on the button of the item"Time".
3. I'll finish the measurement in the "Exit" in the upper rightcorner.
* During the measurement recording tag
1. I will start shooting in the lower right of the screen "camera"button.
2. Screen is lower left "icon" button. When you tap the icon listis displayed.
1. For example, please try to tap the "branch" icon.
2. I will move to branch registration screen.
3. I can select the branch and "left", "right", "middle""unselected".
4. "Comments" I can save notes such as notes on.
5. "Record" button: I will save the icon.
6. "Photo also record" button: The camera is activated when youtap, photos and icons can be simultaneous save.
7. "Cancel": I will cancel the registration.
* After the measurement recording tag
When the measurement is complete, you will see the "share" buttonin the upper right corner of the screen. You your own hiking recordcan be to share it with your friends you are using a "mountain girlCalendar"! Your friends for the first time go mountain such as theroot and attention place, it is very convenient to share yourinformation!
1. Let's tap the "Share" button!
2. Select "OK" in the data export screen.
3. Select "Gmail" from the list.
4. I can send a record of your own to your friends by e-mail!
* Map tag
Please tap the "map" tag. Map after measurement in • You can beseen.
<"List" button at the bottom right of the screen>
1. When you tap, the list will be displayed in a horizontalrow.
ーーー "Elevation": you can see the mountain of altitude graph.
ーーー "Map Change": Switches displayed in the aerial photo of themap. From the list again to revert to the original, please tap the"map change".
ーーー "Google Maps": I launch the Google Maps app.
ーーー last of the list, "GSI": You launched a map of the GeographicalSurvey Institute.
<"Switch" button in the lower left screen>
Here I can display switching of map of photos and icons.
1. "ALL": I to display all.
2. "Hidden": This is a choice that is not anything to be displayedin the non-root to the calendar.
3. "Captured by the camera": I to display only the camera icon ofshooting locations.
4. Otherwise choice for causing the individual display eachicon.
1. Camera mark appears on the root.
2. Please try to tap any of the camera mark.
3. Map photos are displayed in the upper left. I can move the photoon the left and right of the arrow below it.
4. Please try to tap the photo.
5. I will move to image editing screen.
6. Location of the address that was shot in the lower left photo isdisplayed, notes can be saved and edited under the.
7. You can send the image by e-mail in the "Email" button in theupper left photo.
* Gallery tag
You can see photos taken all.
1. Let's try to tap the one picture.
2. In the photograph memo I can save in the comments! You can alsodelete the photo.
3. To return to the gallery, please press the mobile Backbutton.
<"Comment" button at the bottom left of the gallerytag>
1. I will move to comment & photos of the screen.
2. Even here I save a comment & you can edit. The time taken,distance, are also displayed, such as altitude.
<"Album" button at the bottom right of the gallery tag>
1. I will move to the album screen.
2. Please the album part try to drag a finger. Album iscurling!
* Calendar description of
1. Pencil mark is displayed on the date on which there is arecord.
2. Is Yamana is displayed at the bottom of the calendar, mark thatmeasurement and exit the editor will be displayed. Move when youtap the part to the recording screen.
From the calendar the top right to bottom in the order
Upper right left
1. "Help" button: I can move to rental calendar description page ofGalleryApp.
Upper right right
2. "Market" button: I have to introduce your other apps ofGalleryApp.
Middle
3. "Weekly View" button: You can switch the calendar in weeklyview.
Below, from left
4. "Add" button: I will register the mountain.
5. "! GO" button: I will start the measurement.
6. "On the day" button: I will return date to the date of theday.
7. "Left", "right" button: I can move the date to the left andright.
8. "List" button: the list of climbing mountains, Japanesesyllabary another, elevation discrimination, by distance, you willbe able to sort separately time.
* I will tap the "List" button on the calendar the lower rightcorner. I go to the list screen.
1. Japanese syllabary View by.
2. And displayed in order altitude is high.
3. View altitude in ascending order.
4. walking distance is displayed in descending order.
5. walking distance is displayed in short order.
6. Time you walked is displayed in descending order.